Body
Overview
Once a print job is submitted to the Managed Print service it must be released in order to have the job produce output on the selected printer. Jobs can be released either at a physical Print Release Station, or through the Print Center website. However, there are some features that may not be available.
Supported Release Options
| |
Print Release Station |
Print Center |
| Available |
- Print expense is charged to swiped UA ID card, or Copy Card
|
- Print expense is charged to the UA identity that submitted the job
- Adjust print options such as color/back & white, sides (single vs double sided printing), number of copies, pages per side, etc.
|
| Unavailable |
- Adjust print options such as color/back & white, sides (single vs double sided printing), number of copies, pages per side, etc.
|
- Charge expense to Copy Card, or other funding source
- APU students, and the general public are unable to access the Print Center website.
|
In this article:
What materials do I need?
- Print Center: UA username and password
- Physical Print Release Station: UA ID Card, or Copy Card
How do I use this technology?
Release Print Jobs via Print Center
Tip
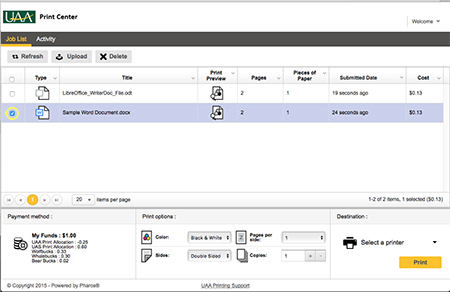
You CANNOT use a Copy/Print Card when using the UAA Print Center to release your print job. You must have funds to cover the total cost of the print job available on your account. The balance of funds on your account is displayed in the lower left corner of the screen under Payment Method.
If you have insufficient funds on your account, you can either add funds to your account and then release your print job, or use the
Print Station option with a Copy Card.
- In a web browser, visit UAA Print Center.
- Login with your UA username & password.
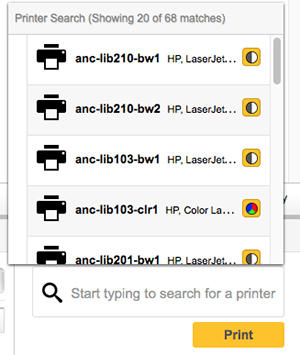
- To release your print job(s), click the Select a printer button to display the printer search window. If you start typing the name of the printer, the list will be automatically filtered based upon the text entered. Also, if you use this method of printing consistently, the system will remember your most used printers and have them displayed at the top of the list. If you need help finding the printer near you, look at the label on the printer. All of the printers should be labeled with a printer name that corresponds to the printer in the Select a printer list.

- The general printer naming convention is “Campus Abbreviation”-“Building Abbreviation”“Room Number”-“Printer Type and Number” (e.g. anc-lib210-bw1, anc-su211-clr1).
- Campus abbreviations currently supported are:
- anc – Anchorage
- krc – Kenai River Campus
- msc – MatSu Campus
- Click the checkbox to select the desired file(s) to print.

- Under the Destination section, click Select a printer to display a pop-up menu with a list of available printers. You can either scroll through the list of printers, or begin typing the name of the desired printer to filter the list. Printer names begin with campus code (e.g. anc, krc, msc), building abbreviation (e.g. lib, psb, rh), room number (e.g. 103), and type of printer (e.g. bw, clr).
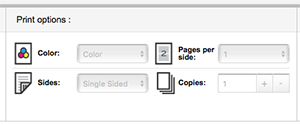
- Once you’ve selected both your file(s) and print destination, you will have the opportunity to customize some of the Print Options. The options that are available to select depends upon the capabilities of the destination print device. For example, you will not be able to select color if you are printing to a black & white printer.
Important
Print options can only be adjusted for print jobs submitted either via email, or uploaded to the Print Center website. Any print jobs submitted using using native macOS/Windows printing will inherit the print settings specified by the submitting computer, that is supported by the specified printer.
The options available include:
- Color: You can choose between printing in black & white or color (default is black & white).
- Sides: You can choose between double-sided (duplex) or single-sided (simplex) printing (default is double-sided).
- Pages per side: Select whether you want to print one document page per side of paper or two document pages per side, allowing you to save paper and minimize your printing cost (default is one).
- Copies: Allows you to select the number of copies of the file you would like printed (default is one).
- Page range: Allows you to select specific page(s), or page ranges, from a submitted multi-page print job.

- After you have made your desired adjustments to the Print Options, if any, when you are near the selected printer and ready to pickup your document, click the Print button.

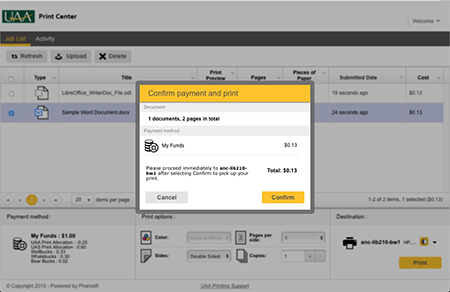
- A Confirm payment and print dialog window will appear that summarizes the number of documents, the total number of pages to be printed, the total cost, as well as the device that the file(s) will be printed to. Please review this information and if it is correct click Confirm. If it is not correct click Cancel. Please be aware that when you click the Confirm button, your selected file(s) will print immediately to the selected print device, and your account will be deducted for the cost of the print job(s) without the additional step of using a physical Print Release Station to release the job.

Release Print Jobs via Print Station
Need additional help or have issues
For support, requests may be submitted anytime by Requesting Support for the Managed Print service. Support Requests are worked by Priority based on the Impact and Urgency of need as well as the order they are received by the IT Employees with the knowledge and permissions to assist with the request.
For immediate assistance please review the Contact Us page for ways to contact the appropriate support group.